Subposition precision, 1:1 translation

This post explains a mechanism for the mouse to stick translation, that allows to reach a better precision and that is required to perform a 1:1 translation.

If you don’t want to read some math, then skip this post ๐Ÿ™‚

All values are considered positive so as to simplify the explanation.

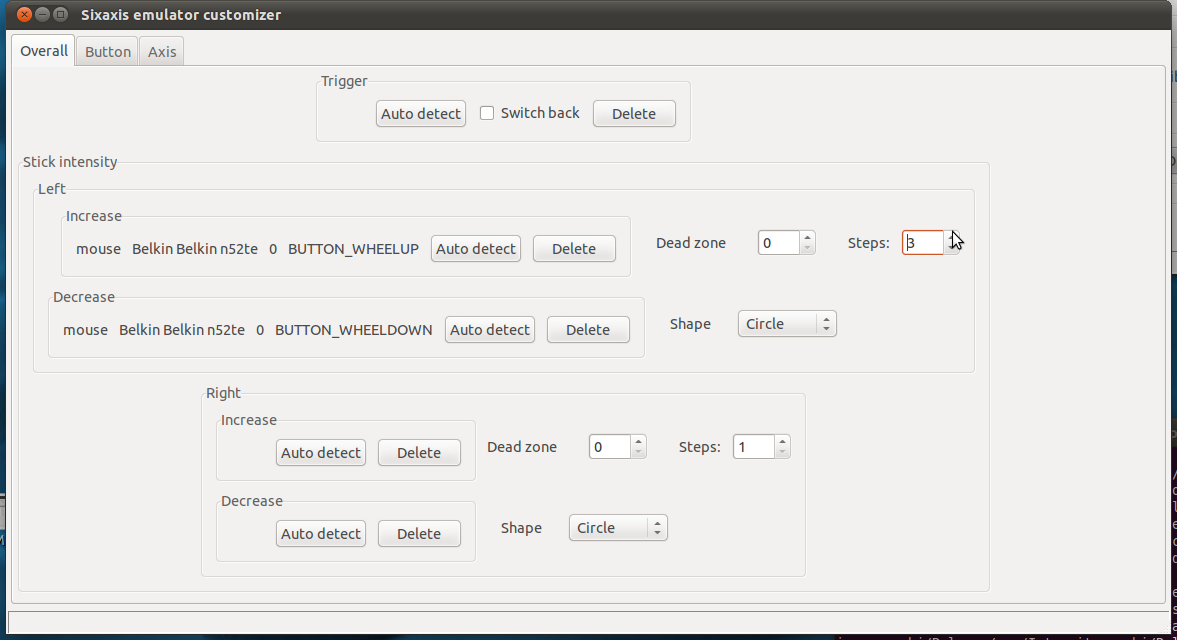
Each 10 ms, the sixaxis emulator processes all pending events.
All mouse motion events are merged and as a result, a single mouse event is processed.
This mouse event contains cumulated x and y deltas: (dx1, dy1).

This motion vector is then translated into a stick position according to the following formula:
  (1) pos1 = dz1 + mul * pow(mv1, exp)
pos1 = desired stick position (real)
dz1 = deadzone (real, function of dx1, dy1 and the deadzone shape)
mv1 = mouse value (integer), dx1 or dy1
mul = multiplier (real, constant)
exp = exponent (real, constant)

The result pos1 is a real. But the final stick position has to be an integer.
What emuclient was doing previously is rounding pos1 to the nearest integer.
This obviously results into a lower or higher speed than the desired one.
A much more precise solution to tackle this real to integer conversion is to truncate pos1, and compute a mouse vector remainder to be added next iteration.

The mouse event that corresponds to the applied stick position is: (dx2, dy2).
dx2 and dy2 are reals.
  (2) pos2 = dz1 + mul * pow(mv2, exp)
pos2 = applied stick position (truncate(pos1), integer)
dz1 = deadzone (same value, the angle is considered to be the same)
mv2 = mouse value (real), dx2 or dy2
mul = multiplier (real, constant)
exp = exponent (real, constant)

Note: norm(mv1) >= norm(mv2)
  (3) vrem = mv1 - mv2
vrem = mouse vector remainder
mv1 is known.
mv2 is computed from (2):
  (4) mv2 = pow[(pos2 - dz1)/mul, 1/exp]
mv2 can be replaced in (3):
  (5) vrem = mv1 - pow[(pos2 - dz1)/mul, 1/exp]
Conclusion:

  • (5) gives the mouse vector remainder that has to be added the next iteration
  • this emulates a subposition precision

Notes:

  • this is useful with 8-bit precision for stick axes as the speed difference between two neighbor stick positions is high
  • this is useless with 16-bit precision for stick axes

Version 0.21 released

Warning: the configuration writer of the mouse calibration mode is not working (issue 82) ๐Ÿ™

If you are upgrading from v0.15 or lower, read this post first: link.

New configuration example installed in the /etc/emuclient folder:

  • CallOfDuty:BlackOpsG500i.xml (with stick intensity control)

Improvements:

  • the calibration mode automatically saves the configuration
  • stick intensity control for button-to-stick mapping
  • macros are fixed
  • emuclient is started automatically
  • the last used config file is auto-selected
  • a (big) memory leak is fixed

All corrected issues:

Download links:

New sixemuconf layout:


It’s now possible to have a better control over a stick with 4 keys or buttons (for ex WASD) and at least 1 modifier key or button (for ex a wheel, which is in fact 2 buttons).

The original idea was to enable to reach mid-positions. This was proposed by KillerBug (see issue 73).

The solution I coded enables to reach more positions of the 8 directions that can be generated with 4 buttons. Up to 127 positions for each direction = up to 1016 positions!

Example:

– dead zone = 31 (null-movement positions = black zone)
– shape = circle
– steps = 3 (number of positions for each direction)

The circle radiuses are 127, 95, 63.
Each red dot is a position we can reach with 4 direction buttons (ex WASD) + at least 1 modifier button (ex wheel).
With shape = rectangle, the red dots are aligned as squares.

Enjoy!!

Ubuntu 11.04

Ubuntu 11.04 is out! Some important changes for the sixaxis emulator:

  • the bluez version is now 4.91

The Ubuntu 10.10 bluez version (4.69) seems to cause some connection problems in some undefined cases.

  • the middle mouse button emulation is now off by default

This “feature” can cause a 50ms lag for left and right mouse buttons.

Download link.

And now, fake sixaxis…

Bouvrie, a reader of this blog, reported issues getting the sixaxis emulator to work.

The connection isn’t successful, even with a dongle that has a chip know to work (CSR bluecore4).

The result of our investigation – see issue 74 – is that the sixaxis doesn’t give the right ps3 bdaddr (bluetooth device address). It always gives the same wrong bdaddr.

Obviously, with a wrong ps3 bdaddr, the sixaxis emulator can’t connect to the ps3.

The reason why this sixaxis doesn’t give the right baddr is simple: it’s a fake one ๐Ÿ™

Connection errors

This post is for people getting connection errors.

Some people reported connection issues that were fixed by upgrading the linux bluetooth stack (default one in Ubuntu 10.10 is version 4.69).

Instructions if you want to do upgrade to the latest version (4.91):

System > Administration > Synaptic Package Manager
Settings > Repositories > Other Software

Add
Apt Line: ppa:blueman/ppa
Close

Reload
Mark all upgrades
Apply

I just upgraded to this version and it seems not to cause any issue on my setup. Do it at your own risk!

Note: bluez version 4.91 is now in Ubuntu 11.04.

What’s next?

Version 0.20 is bringing many new stuffs and I hope its quality is good. I was thinking to code more things for this release, but it would have even more delayed the release date. Issues 66, 68 and 70 (enhancements, not bugs) will probably be fixed in the next release.

There also are a few things I want to work on.

  • Translation tables

I already studied the stick position to rotation speed relation some time ago (link). Measuring rotation speed for each stick position is quite painful, and I’m thinking to design a tool to automate it. I want this to work with a cheap video capture card (about 10$).
Why do I want to study rotation speed? I want to add some translation tables (there will be one different translation table for each game) so that a 1:1 translation can be achieved. A 1:1 translation means that if you double your mouse speed, your rotation speed will double. This aims to produce a better PC-feel.

Following chart gives the rotation speed vs stick position measured for COD:MW2:


It’s obviously not 1:1, especially for positions lower than 50.

Following table (values do not correspond to the above chart) shows how to perform a 1:1 translation:

1:1 translation
position speed 1:1 speed 1:1 position
1 0 8 7
32 91 140 57
64 295 480 85
96 589 720 108
128 960 960 128

All stick positions are required. Speed unit is ร‚ยฐ/s.

First column is the stick position.
Second column is the measured rotation speed.
Third column is the speed that we would expect with a 1:1 position to rotation speed translation (position*max speed/max position).
Fourth column is the translation of the position to perform a 1:1 translation. Look for the expected speed in the 2nd column (closest value) and look what position it is in the first column, this gives the 1:1 position.

The translation looks like this:

This position to position translation may introduce a loss of precision. It probably would be better to have a direct speed to position translation.
  • Better precision for the right analog stick

8-bit precision allows 256 stick positions. 10-bit precision allows 1024 stick positions. More positions give a finer control. As a comparison, a high-end mouse reports x and y values with a 16 bit precision.

The official sixaxis page tells that analog sticks and l2/r2 buttons have a 10-bit precision. This is wrong: stick and button positions are reported with a 8-bit only precision. Only motion sensing controls have a 10-bit precision. This is lame because many people are saying that the Xbox360 pad is technically lower than the Sixaxis (8-bit precision vs 10-bit precision), which is absolutely wrong.

We can’t change the precision of the sixaxis emulator, but it is probably possible to build a usb gamepad interface that has a precision higher than 8-bit for the right stick.

Version 0.20 released

WARNING: this release totally breaks the configuration compatibility.

EDIT 21 April: The macro fonctionnality is broken ๐Ÿ™

New configuration examples are installed to the /etc/emuclient folder:

  • CallOfDuty:BlackOps.xml (updated)
  • CallOfDuty:BlackOpsG500+G5.xml (configuration for 2 controllers)

Following items in the edit menu of Sixemuconf will let you convert your old configuration quickly:

  • Replace mouse: detect and replace mouse name&id in the current controller
  • Replace keyboard: detect and replace keyboard name&id in the current controller

Due to the correction of issue 60, you also will have to change ALL your mouse multipliers depending on your mouse frequency:

  • 125Hz : divide by 1.25
  • 250Hz : divide by 2.5
  • 500Hz : divide by 5

If you don’t know what frequency your mouse is running at, just try each value (or ask google for your mouse max frequency, and limit it to a maximum of 500Hz). High-end mice like the Logitech G5 or G500 are running at 500Hz (default frequency).

I know, this incompatibility sucks, but the new features in this version are worth the price. This probably won’t happen another time.

To prevent beginners to use this version until I’m sure its quality is good, I will not change the version in the tutorial, and the previous version will remain “featured” in the googlecode download page. About 500 people downloaded the previous version ๐Ÿ™‚ I’m waiting everyone’s feedback! I’m just joking, but I really appreciate a few words and I accept both positive and negative feedbacks.

Main improvements:

  • multiple mice & keyboard (new configuration examples in /etc/emuclient)
  • synchronization improved
  • mouse translation improved
  • up to 8 configurations per controller
  • new mouse calibration mode

All corrected issues:

Download links:

New items in the edit menu of Sixemuconf:

The “Replace Mouse DPI” item lets you adjust your multipliers according to your old and new mouse dpi values (the higher the better). I recently bought a Logitech G500 (which is excellent by the way), and I run it at its max dpi (5700). My previous mouse is a Logitech G5 (max 2000 dpi). This means I had to multiply my multipliers by: 2000/5700.

New calibration mode, displayed in Sixstatus:

This calibration mode lets you calibrate each mouse independently. It reads values from the loaded configuration, but it still doesn’t save them (use Sixemuconf to apply changes to the configuration file). To change values, use rctrl+FX key combinations and use the mouse wheel.

Enjoy!!