Moved: link.
[spoiler]Warning: this tutorial is updated frequently. Don’t copy it. Link to it.
Please note that I don’t give support for anything else than Ubuntu running in a non-virtualized machine.
Introduction
This tutorial explains how to control a PS3 with PC peripherals (keyboards, mice, joysticks) plugged on a PC running Linux and using a bluetooth dongle.
This is possible thanks to the early work of Jim Paris.
I applied many modifications to its source code, developed a GUI to make the launch and the configuration easier, and simplified the installation steps for debian-based Linux distros such as Ubuntu.
If you want to see how well this works, have a look at this video made byMcKack (version 0.11):
Requirements
- a sixaxis already used with the target PS3
- a bluetooth dongle with a chip that can have its bdaddr (bluetooth device address) changed. Just perform the tutorial to discover if your dongle works.
Notes
Do it at your own risk. I’m not responsible for any damage you can cause to your PS3 or PC.
Some cheap (a few $) CSR Bluecore4 dongles on ebay are reported to work. Bluecore4 is the first CSR bluecore chip that implements EDR (Enhanced Data Rate), so that the keywords to look for are CSR and EDR. Warning: most of these dongle are counterfeits! Please note that I’m not responsible for any not working dongle you might buy.
Don’t try to use the sixaxis emulator and the sixaxis at the same time, and restore the bdaddr of the dongle if you don’t use it with the sixaxis emulator anymore.
This tutorial was written running ubuntu from a live usb disk (nothing is saved on the hard drive).
Feel free to install ubuntu on your PC! If you have a Windows OS installed, you can read this tutorial if you want to install ubuntu on your hard drive without erasing the Windows OS.
Another way to use the sixaxis emulator is to run it from a Ubuntu Live USB Persistent Flash Drive (read this post).
1 Installation
Add “universe” to your repositories:
– Clic System>Administration>Synaptic Package Manager.
– Clic Settings>Repositories.
– Select universe, close.
– Clic reload, close.
Download following file:
Install it (double clic, then install).
2 Quick start
Plug your sixaxis (and the bt dongle, if external) to your PC.
Launch sixemugui (shortcut: Applications>Game>Sixemugui).
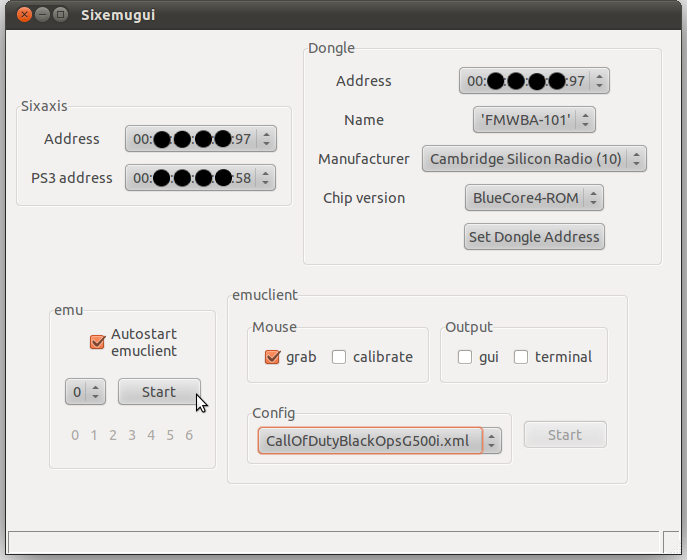
- Select the sixaxis
- Select the bt dongle
- Set the dongle address (don’t forget to write the old one down)
- Re-select the sixaxis and the bt dongle
- Unplug your sixaxis and if it doesn’t power off by itself, press the PS3 button until it powers off
- Select emuclient parameters
- Select the configuration file to use
- Start emu (emuclient starts automatically if the connection is established)
- Play (press Escape to quit emuclient)
- Stop emu
Note: File>Save lets you save the sixaxis and PS3 addresses so that you don’t require to plug the sixaxis anymore after that.
3 Custom mappings for mouse, keyboard and joysticks
It is recommended to change the mappings and to calibrate the mouse for each game.
Configuration files have to be saved into the ~/.emuclient/config directory (~ is the home directory).
Launch sixemuconf (shortcut: Applications>Game>Sixemuconf).
Screenshots of my configuration for COD: Black Ops:
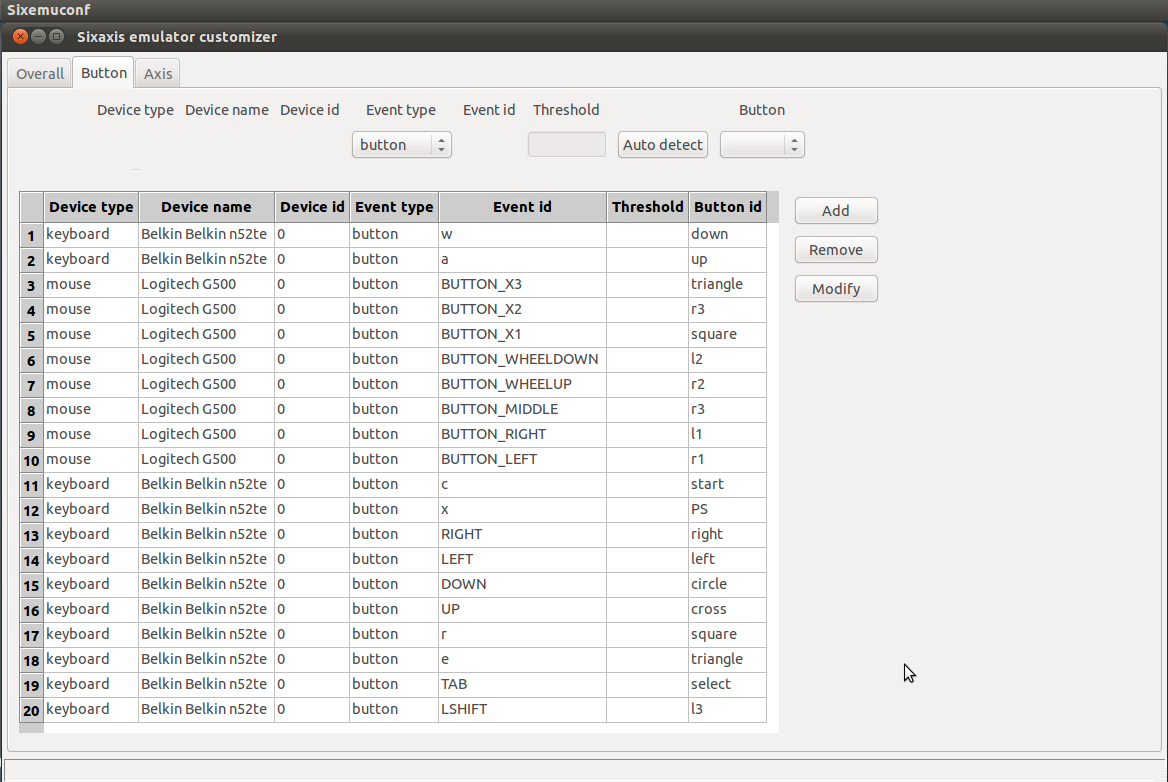
 It’s possible to define a configuration for aiming: copy-paste the configuration #1 to configuration #2, define the right mouse clic as configuration #2 trigger with switch back, and adjust the mouse multipliers & exponents.
 Items of the “Edit” menu that allow to convert a configuration:
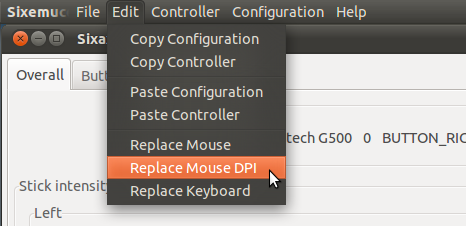 The “Replace Mouse” item allows to change the mouse name and id.
The “Replace Keyboard” item allows to change the keyboard name and id.
The “Replace Mouse DPI” item allows to adjust the mouse multipliers according to old/new dpi values (the higher the better).
Stick intensity control for button to stick mappings:
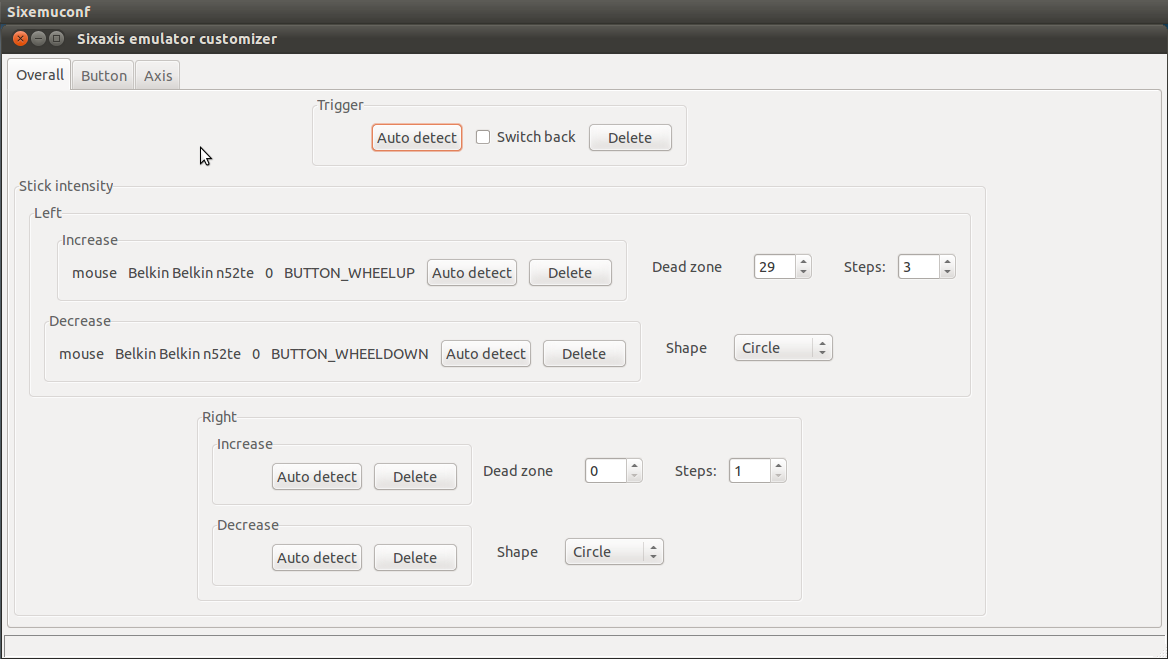 See this post for more details about this functionnality: link.
4 Mouse calibration mode
Before calibrating the mouse, be sure to set the in-game sensitivity to the highest, and be sure to set the mouse dpi to the highest value.
To start emuclient with the mouse calibration mode enabled, select Mouse>Calibrate in the sixemugui application. Then start emuclient.
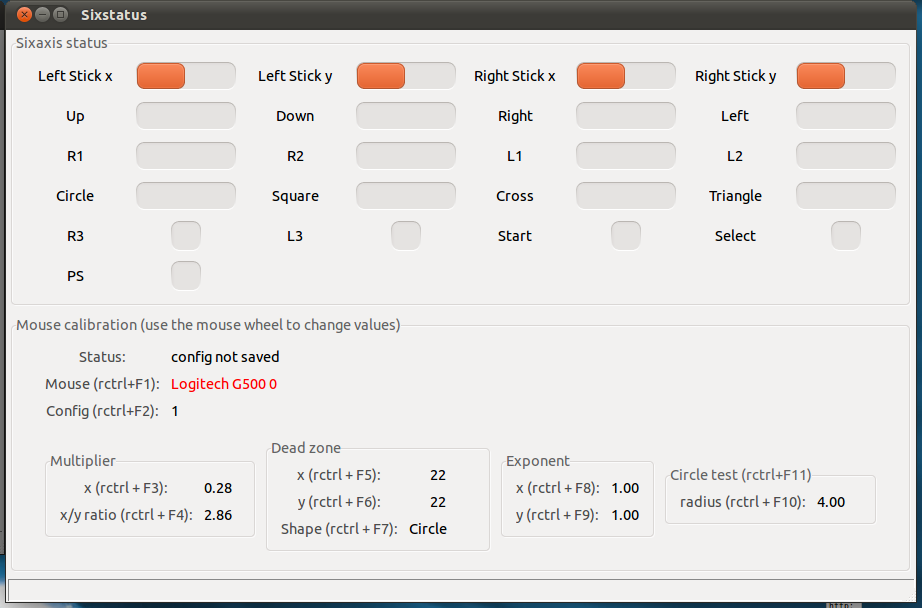 Current mouse calibration values appear in the “Mouse calibration” part of the gui.
This calibration mode lets you calibrate each mouse independently. It reads values from the loaded configuration. To change values, use rctrl+FX key combinations and use the mouse wheel.
The dead zone value has to be set to the highest stable position.
Different dead zones for x & y only makes sense for a “rectangle” dead zone shape.
The dead zone shape has to be set to the most stable one.
5 Keyboard macros
It’s possible to configure keyboard macros.
A key press will generate a series of events, with timing conditions.
Commands are the following:
– key down
– key up
– key press (= key down + delay + key up)
– delay (unit = ms)
Each macro has to be defined in a file saved into the ~/.emuclient/macros directory (~ is the home directory, .emuclient folder is hidden).
Example: macro_example.txt
#Defines the action that triggers the macro execution
MACRO F1
#Performs a keystroke (key down + delay 50ms + key up)
KEY e
#Sleep 50ms
DELAY 50
#Perform a key down
KEYDOWN SPACE
#Sleep 50ms (minimum delay between KEYDOWN and KEYUP)
DELAY 50
#Perform a key up
KEYUP SPACE
Lines beginning with # are comments.
All keys of the keyboard can trigger a macro. The complete list can be found in conversion.c.
6 Troubleshooting / Feedback
I’m sharing my project for free, so please give me a feedback.
Tell me if it works or doesn’t work, and especially add the following details:
- the Linux distribution
- the PS3 hardware version (slim, fat 40Gb, fat 60Gb, …)
- the PS3 firmware version
- the bluetooth dongle (exact model + revision if there is one + output of commands “hciconfig -a hci0” and “sudo hciconfig hci0 revision” in a terminal)
- the hardware of the PC (at least the CPU and the amount of RAM)
Report that in commentary to this post.
And if it doesn’t work, first verify if you have the latest packages. Then look at the FAQ and the bug list, see if your problems are already known, and if it’s not, report them.
If you want to contribute to this project, have a look at this page.
Paypal donation links are on the top right corner of this page.[/spoiler]


